
Once you have an object inserted into your spreadsheet you can select it and click the Bring to Front button. This will place the object in front of everything so no part of it is hidden. The Send to Back button is just the reverse. Once you select your object click the Send to Back button and it will send the object behind everything.
The next button is Selection Pane. Click the Selection button and notice you get a pane on the right side of your spreadsheet.

The Pane will list all of the objects you have on your spreadsheet. You can move them front to back using the arrows at the bottom of the pane.
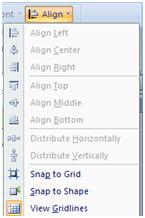 The Align button will let you align the edges of objects so you can have a uniform look. If you click the down arrow you can see all of your options. You can align the left edges, center the objects, align the right edges, align the top middle or bottom of objects.
You can also move the objects so they appear evenly across the page either horizontally or vertically.
The Snap to Grid options will only let you move the object to line up with the gridlines. You can view the Gridlines with the last option or create a shape and only be able to move the object within the shape.
To Group objects together click one object and hold down the Ctrl button and click the other objects. Then click the Group button. This will let you move and edit the objects as a whole. Once you have grouped items together you will have the option to ungroup them in the Group down arrow.
The last button is Rotate. If you click the object then the down arrow on the rotate button you have the options to flip the object over, rotate it 90 degrees clockwise or counter clockwise.
That concludes the Page Layout tab of Word 2007. Click the next button to continue to the Formulas tab or click one of the below links to try another tutorial.
No comments:
Post a Comment