The Excel 2007 formulas tab is for more advanced users. I am going to go through this section quickly, but remember if you have specific questions about using formulas please email me.
The 1st section is the Function Library. This section contains buttons that will help you with all of the different formulas Excel 2007 provides.
 In this section the first button is the Insert Function button. This button allows you to edit the formula in the cell that you have selected. Formulas are equations that perform calculations with numbers in the cells in your spreadsheet.
A formula always starts with an equal sign (=). For example 4+2*5 will multiply 2 and 5 then add 4.

Auto Sum is a common function that even beginner users find helpful. If you click the down arrow on the Auto Sum button you will see a list of formulas you may find useful.
To use these formulas click on the cell you want your answer to appear. (If the cell you choose is not directly below a list of numbers Excel will place the formula and let you highlight the numbers you want to use.) Then select the Auto Sum function you want to use; Sum will add your numbers,
Average will provide an average to a list of numbers, count numbers will count how many numbers you have, Max will find the highest number in your list, and Min will find the lowest number. Once you click your formula your work is done and Excel will provide your answer.
I am going to go through the rest of the Functions quickly. Please email me if you have any questions.

The Recently Used button will change as you use more functions. The down arrow will list your most commonly used formulas.
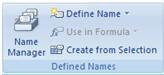
The next section in the Formulas tab is the Defined Names section. This section we will learn about finding names in your spreadsheets and defining cells with names instead of cell numbers.
Click on the first button Name Manager. This will open another window.
In the Name Manager window you can create, edit, delete and find all of the names in your workbooks. You can use the names in your formulas instead of cell references.
The Name Manger function is a great tool if you have several sheets, tables, and formulas in your spreadsheet. It makes it easier to memorize names rather than hunting for cell numbers.
The next buttons; Define Name, Use in Formula, and Create from Selection let you do the same thing as the name Manger button, except you do it with individual cells.
The Define Name button you select the cell you would like to name and click the Define Name button this will bring up a window for you to name the cell then you will not have to use the cell number in your formula.
For the Use in Formula button you select a cell that already has a formula and then click the Use in Formula button. It will give you a list of all the named cells in the work book to choose from.
The last button in this section is the Create from Selection. This button will automatically create names from a selected group of cell.
If you need more information on this topic please email me.

The next section in the Formula tab is Formula Auditing. I am going to go through these quickly to give you the basic idea of how they work and if you have specific questions please contact me.
The First button is Trace Precedents. To use this button click on a cell that has a formula then click the Trace Precedents button this will draw arrows to the cells that affect the results of the formula. To use the Trace Dependents button click on a cell that is associated with a formula. This will draw arrows to the formulas that the cell is associated with.
To remove the arrows from the Trace Precedents and Trace Dependents buttons click the Remove Arrows button. If you just want to remove one or the other click the down arrow for those selections. The next button is Show Formulas. Click this button and you will see the cell formula instead of the value or result. Click the button again to hide the formulas and see the results again.
The Error checking button will check for common errors made when creating a formula in Excel.
If you have a long formula the Evaluate Formula button can be helpful. It will open a window that will allow you to look at each part of the formula and help to find errors.
The Watch window is a neat feature. If you have several formulas in your spreadsheet and would like to see what happens to a series of formulas when you are changing cells in your spreadsheet. Click the Watch Window button. A window comes up. Click on a cell that has a formula and click the Add Watch button in the watch window. It will add the cell to the watch window. You can add as many cells as you like to this window and as you make changes to your spreadsheet you have a central location to look at the values of your formulas.

The next section in the formula tab is Calculation. Calculation Options button give you the choice of having values in a formula be calculated automatically when changes are made to cells that affect the formula, automatically change them except if the formula is in a table, or to have you manually update formulas by clicking either the calculate now button to update the calculations in the workbook you are working on or the Calculate sheet button to update the formulas in the sheet you are working on.
That wraps up the formulas tab tutorial. I know I went very fast through this but please email me if you have specific questions.
The 1st section is the Function Library. This section contains buttons that will help you with all of the different formulas Excel 2007 provides.
In this section the first button is the Insert Function button. This button allows you to edit the formula in the cell that you have selected. Formulas are equations that perform calculations with numbers in the cells in your spreadsheet.A formula always starts with an equal sign (=). For example 4+2*5 will multiply 2 and 5 then add 4.
Auto Sum is a common function that even beginner users find helpful. If you click the down arrow on the Auto Sum button you will see a list of formulas you may find useful.
To use these formulas click on the cell you want your answer to appear. (If the cell you choose is not directly below a list of numbers Excel will place the formula and let you highlight the numbers you want to use.) Then select the Auto Sum function you want to use; Sum will add your numbers,
Average will provide an average to a list of numbers, count numbers will count how many numbers you have, Max will find the highest number in your list, and Min will find the lowest number. Once you click your formula your work is done and Excel will provide your answer.
I am going to go through the rest of the Functions quickly. Please email me if you have any questions.

The Recently Used button will change as you use more functions. The down arrow will list your most commonly used formulas.
- The Financial button will give you a list of financial functions such as accrued interest.
- Logical will give you true or false results.
- Text functions can do things like capitalize the first letter in each word, find a word, or give you the phonetic characters from a string of text. This is just a few examples.
- The Date button will give you options to calculate the number of days between two dates, give you a serial number for today’s date, or will give you the number of work days. Again these are just a few options.
- Lookup & Reference can do things like create a hyperlink, reference a column or row, or create an index.
- The Math & Trig feature I used a lot when I was in college. This will help you with many of the formulas you are learning in advanced math classes.
- More Functions includes formulas for statics, engineering, and much more.

The next section in the Formulas tab is the Defined Names section. This section we will learn about finding names in your spreadsheets and defining cells with names instead of cell numbers.
Click on the first button Name Manager. This will open another window.
In the Name Manager window you can create, edit, delete and find all of the names in your workbooks. You can use the names in your formulas instead of cell references.
The Name Manger function is a great tool if you have several sheets, tables, and formulas in your spreadsheet. It makes it easier to memorize names rather than hunting for cell numbers.
The next buttons; Define Name, Use in Formula, and Create from Selection let you do the same thing as the name Manger button, except you do it with individual cells.
The Define Name button you select the cell you would like to name and click the Define Name button this will bring up a window for you to name the cell then you will not have to use the cell number in your formula.
For the Use in Formula button you select a cell that already has a formula and then click the Use in Formula button. It will give you a list of all the named cells in the work book to choose from.
The last button in this section is the Create from Selection. This button will automatically create names from a selected group of cell.
If you need more information on this topic please email me.
The next section in the Formula tab is Formula Auditing. I am going to go through these quickly to give you the basic idea of how they work and if you have specific questions please contact me.
The First button is Trace Precedents. To use this button click on a cell that has a formula then click the Trace Precedents button this will draw arrows to the cells that affect the results of the formula. To use the Trace Dependents button click on a cell that is associated with a formula. This will draw arrows to the formulas that the cell is associated with.
To remove the arrows from the Trace Precedents and Trace Dependents buttons click the Remove Arrows button. If you just want to remove one or the other click the down arrow for those selections. The next button is Show Formulas. Click this button and you will see the cell formula instead of the value or result. Click the button again to hide the formulas and see the results again.
The Error checking button will check for common errors made when creating a formula in Excel.
If you have a long formula the Evaluate Formula button can be helpful. It will open a window that will allow you to look at each part of the formula and help to find errors.
The Watch window is a neat feature. If you have several formulas in your spreadsheet and would like to see what happens to a series of formulas when you are changing cells in your spreadsheet. Click the Watch Window button. A window comes up. Click on a cell that has a formula and click the Add Watch button in the watch window. It will add the cell to the watch window. You can add as many cells as you like to this window and as you make changes to your spreadsheet you have a central location to look at the values of your formulas.
The next section in the formula tab is Calculation. Calculation Options button give you the choice of having values in a formula be calculated automatically when changes are made to cells that affect the formula, automatically change them except if the formula is in a table, or to have you manually update formulas by clicking either the calculate now button to update the calculations in the workbook you are working on or the Calculate sheet button to update the formulas in the sheet you are working on.
That wraps up the formulas tab tutorial. I know I went very fast through this but please email me if you have specific questions.
No comments:
Post a Comment