Outlook 2007 calendar give you the ability to schedule appointments, set reminders, invite people to appointments, and categorize appointments. It is a full feature program for all of your scheduling needs.
Click on the Calendar button to open up Outlook 2007 calendar features. Depending on the view you have selected for default your screen should look similar to this.

This is the working screen for the calendar features. This screen may deviate a little depending on your view settings. At the top you will have the same menu items as you have in all screens of Outlook 2007. Below the Menus is a row of button we will cover next. On the left hands side is a navigation pane. Your navigation pane may be minimized. If so, click on the double arrow pointing right and the navigation will look like the above example.
In the Navigation pane you will see a small calendar of the current month. You can change the month by using the left and right arrows are either side. This will change the month is the navigation pane and the main screen.
Below the calendar is a search setting. Click the down arrow to see a list of option to select. If the item is highlighted and has a check mark in front of it is will be included in the any calendar search performed in Outlook.
You can create more than one calendar in Outlook 2007. Below the search settings are a list of your calendars and options to share and create new calendars. The calendar(s) that have a check mark next to them are the ones displayed in the main screen. If you have more than one calendar you can view them side by side by checking multiple calendars. The calendars will have different colors and the tab will have the calendar name.
 The first option under the calendar list is How to share calendars. This option will open a help window when you click on it. In the help window it will guide you step by step how to set up your calendar to be viewed by other people.
 Open a Shared Calendar gives you the option to view someone else's calendar. Click on this option and the Open a Shared Calendar window opens. In this window you can either type the person's name or click on the name button to open a list of names. Select the name of the person you would like to see and Click OK. Click OK again to close the Open a Shared Calendar window. If the person has not given you permission to view their calendar you will recive an error message from Microsoft Outlook.
 In this window you will be given the choice to request permission to view the calendar from the selected person.If you wish to request permission click
Yes and an email will be sent to
the person requesting that they grant
you permission to view their calendar. Once you have been granted permission their calendar will appear in your calendar list.
If you would like to share your calendar you click the Share My calendar link in the task pane. This will open an email window for you to select the recipients you would like to share your calendar with.
 Click the to button to select your recipients. You can then compose a personal message or just use the default message. When you are finished composing the message click the Send button. This will send an email to the selected recipients with an icon for them to accept or reject your request. Once they have accepted your request to share your calendar your calendar will be visible to them in their task pane.

The next option in the calendar task pane is Send a calendar via email. Click on this link to open the Send a Calendar via E-mail window. In this window use the drop down arrow to choose what calendar you would like to send (if you use more than one) if you only have one calendar it will be selected by default.
Next select the Date Range using the drop down arrow. This will give you the details in the Detail window.
You can set your working hours and only show those times in the sent calendar. To set specific working hours click on the Set working hours link and when the window comes up mark your hours and click OK to return to this window. Check the Show time within my working hours only box if you only want to show your working schedule.
Click the Show button to see advanced options. This will expand the window to give you the options Include details of items marked private, Include attachments within calendar items, and your email layout. Click the OK button and your calendar with the selected options will be placed in the body of an email message. From here select the persons you would like to receive the calendar, type a personal message if you wish and click send.
 Publish my Calendar is the next link in the task pane. This feature gives you the opportunity to publish your calendar online for multiple people to view who may not use outlook. Click on this link, if this is the first time you have published a calendar you will receive the Microsoft Office Online registration window. Sign into your Windows Live ID. If you do not have an ID you can sign up for one at www.windowslive.com
After signing in you will need to confirm you accept the privacy policy. Type your email address and click next.
If you have previously published calendars you can check the box to remove all previously published calendars and click next.
This will bring you back to Outlook 2007 to the Publish Calendar to Microsoft Office Online Window.
Select the Time span you would like to publish
using the drop down arrows. Use the
 drop down arrow in Details to select how much detail you would like displayed.
Set your working hours if you would only like to display your working hours on your published calendar, or leave it unchecked to show the entire day. Select your permissions. If you select Only invited users can view this calendar you will have to send your viewers an invitation to share this calendar with them. If Anyone can view and search for this calendar is selected you will be opening your calendar up to anyone with an Office online account. If you open your calendar to everyone the Office Online Community Submitted Calendars section will no longer be grayed out. In this text box type a description of your calendar to make it easier for people to find.
 Click the Advanced button to open Published calendar Settings. In this window you will have the option to Automatically update your published calendar. This option will automatically upload changes to the online calendar periodically. The Single Upload option will only upload the current calendar. If you choose to update the calendar automatically make sure the Update Frequency box is checked. Click OK when finished to return to the Publish calendar to Microsoft Office Online window. Click OK in this window to return to Outlook 2007 and complete publishing your calendar.
The last option is to Add a new Group. This will make a new heading Type the title of the heading and now calendars can be categorized by groups. If a calendar is in a group category it will appear under the group heading.

Now I am going to begin moving across the top of the working screen going over the icons functions. The first icon is New. This is used to create new appointments, meeting requests or other items in Outlook 2007.
Click on the first selection, Appointment. This will bring up the Untitled appointment window defaulted to the date selected on the calendar in the working screen. In this window type the subject of your appointment, the location and the time. Save and Close to enter the appointment into your calendar. If you want more information on selecting details of the appointment click here to go to the appointment link of this site.

Click on new and select Meeting Request. This will open a similar window to the Appointment. The only difference will be the To option. In this option click the To button to select the person you would like to request be at the meeting. Everything else if filled out just like an appointment. More information can be found at the appointment link.
The remaining options can be found from any point in Outlook 2007. Each option is discussed in the specific topic page. Follow one of the following links to view the web pages. Mail, Contact, Task, Journal Entry, or Note.

The next icon is the printer. Click the printer icon to view the printer options window. In the Print window you can select the printer you would like your calendar to be printed to by using the down arrow in the Name section. Below the printer name is the option to select what calendar you would like to print, the style, page setup, the date range, and if you would like details of private appointments hidden. To the right of the Calendar selection is the options for the number of pages, how many copies, and a collate option. Make your selections and click OK to print your calendar.
Delete is the next icon. The delete button will be grayed out unless an appointment is selected in your calendar working screen. To delete an entry in your calendar select the appointment and click the delete button. Outlook will have a window confirming you would like to delete. Click OK and the entry will be removed and placed in your deleted items folder.

Just like email messages you can color code appointments in your calendar with the category button. Click this icon to see the list of categories already entered into your Outlook. If you have an appointment that has already been assigned a category(s) and would like to remove it select the appointment, click the categories icon and select clear All Categories.
To assign a category that has already been created to an appointment click the appointment, click the category icon and select the category from the list. If you want to set more than one category to an appointment click the All Categories option. This will bring up the Color Categories window.
 In this window you can select more than one category by clicking the left hand side of the box and placing a check mark next to the category. In this window you can also create new categories with the New button. Click the New button and type the name of the category and select a color. To rename a category click the category and click Rename. This will bring up a window for you to type the new name. To Delete a category click the category and click the Delete button. To change the color select the category and click the down arrow in the color option and select another color. Click the down arrow for the shortcut key to select a keyboard short cut key to assign a category to a calendar appointment when the combination of keys are pressed. Click the OK button to save your changes and return to Outlook.
 The last option in the Category icon is the Set Quick click option. Click on the Set Quick Click selection and the set Quick Click window comes up. This will be your default selection when you click on categories column to assign a default category. Use the drop down arrow to select the category you will use most often and the selected category will be able to be assigned with a single click.
 The icon next to Categories is Group Schedules. This is used to view the calendar of a specific group. Click on the Group schedules icon and the Group schedules window will open. If you already have groups set up you will see a list of groups in the left hand list. If you would like to create a group click the new button. This will open a new window for you to title the group . Type the name of the group and click OK.
You will get a new window titled with the name of your group. In this window you will see the list of members you have set up in the group. If you have no members click on in the Group members box and type the name of the group member. If the person is in your contact list their email address will be found and placed in the Group Members list. Any calendars they have shared with you will be displayed in the calendar to the left of the member list.

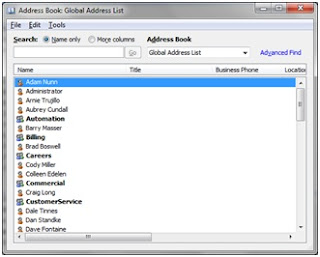 The next button is the address book button. This button will open the Address book. This button is used as a reference. To view any of the contacts double click on them and their contact information will come up in a new window. In the window you can take notes on phone conversations, see what organizations they are part of, see the email groups they are include in, and a list of all of their email addresses.
The File, Edit, and Tools menus give you some of the features available in the contact section of Outlook. The File menu gives you the options to create a new contact, create a new message to the selected contact/contacts, add a contact to a different list, delete a contact, or view the properties. Edit will let you undo a change, cut, copy, and paste.

Tools will open an advanced find window or an options window. The Options selection will open the Addressing window. In this window you make selections to accommodate how you would like to view you contact lists.
The first option lets you change the list shown by default when you open the address book. Next is selecting what list you would like your personal contact. The last option lets you choose what list you want to search when you are typing an email. When you address an email you can type the first few letters of the email address or contacts name and a drop down list will appear for you to click on the persons email address so you don't have to type the whole address. Click OK to save the changes and return to the address book. Click the red X to close the address book.
 The last button is the Help button. This button will bring up a help window for you to search for questions about Outlook 2007.
Click on the Calendar button to open up Outlook 2007 calendar features. Depending on the view you have selected for default your screen should look similar to this.

This is the working screen for the calendar features. This screen may deviate a little depending on your view settings. At the top you will have the same menu items as you have in all screens of Outlook 2007. Below the Menus is a row of button we will cover next. On the left hands side is a navigation pane. Your navigation pane may be minimized. If so, click on the double arrow pointing right and the navigation will look like the above example.
In the Navigation pane you will see a small calendar of the current month. You can change the month by using the left and right arrows are either side. This will change the month is the navigation pane and the main screen.
Below the calendar is a search setting. Click the down arrow to see a list of option to select. If the item is highlighted and has a check mark in front of it is will be included in the any calendar search performed in Outlook.
You can create more than one calendar in Outlook 2007. Below the search settings are a list of your calendars and options to share and create new calendars. The calendar(s) that have a check mark next to them are the ones displayed in the main screen. If you have more than one calendar you can view them side by side by checking multiple calendars. The calendars will have different colors and the tab will have the calendar name.


Yes and an email will be sent to
the person requesting that they grant
you permission to view their calendar. Once you have been granted permission their calendar will appear in your calendar list.
If you would like to share your calendar you click the Share My calendar link in the task pane. This will open an email window for you to select the recipients you would like to share your calendar with.


The next option in the calendar task pane is Send a calendar via email. Click on this link to open the Send a Calendar via E-mail window. In this window use the drop down arrow to choose what calendar you would like to send (if you use more than one) if you only have one calendar it will be selected by default.
Next select the Date Range using the drop down arrow. This will give you the details in the Detail window.
You can set your working hours and only show those times in the sent calendar. To set specific working hours click on the Set working hours link and when the window comes up mark your hours and click OK to return to this window. Check the Show time within my working hours only box if you only want to show your working schedule.
Click the Show button to see advanced options. This will expand the window to give you the options Include details of items marked private, Include attachments within calendar items, and your email layout. Click the OK button and your calendar with the selected options will be placed in the body of an email message. From here select the persons you would like to receive the calendar, type a personal message if you wish and click send.

After signing in you will need to confirm you accept the privacy policy. Type your email address and click next.
If you have previously published calendars you can check the box to remove all previously published calendars and click next.
This will bring you back to Outlook 2007 to the Publish Calendar to Microsoft Office Online Window.
Select the Time span you would like to publish
using the drop down arrows. Use the

Set your working hours if you would only like to display your working hours on your published calendar, or leave it unchecked to show the entire day. Select your permissions. If you select Only invited users can view this calendar you will have to send your viewers an invitation to share this calendar with them. If Anyone can view and search for this calendar is selected you will be opening your calendar up to anyone with an Office online account. If you open your calendar to everyone the Office Online Community Submitted Calendars section will no longer be grayed out. In this text box type a description of your calendar to make it easier for people to find.

The last option is to Add a new Group. This will make a new heading Type the title of the heading and now calendars can be categorized by groups. If a calendar is in a group category it will appear under the group heading.

Now I am going to begin moving across the top of the working screen going over the icons functions. The first icon is New. This is used to create new appointments, meeting requests or other items in Outlook 2007.
Click on the first selection, Appointment. This will bring up the Untitled appointment window defaulted to the date selected on the calendar in the working screen. In this window type the subject of your appointment, the location and the time. Save and Close to enter the appointment into your calendar. If you want more information on selecting details of the appointment click here to go to the appointment link of this site.

Click on new and select Meeting Request. This will open a similar window to the Appointment. The only difference will be the To option. In this option click the To button to select the person you would like to request be at the meeting. Everything else if filled out just like an appointment. More information can be found at the appointment link.
The remaining options can be found from any point in Outlook 2007. Each option is discussed in the specific topic page. Follow one of the following links to view the web pages. Mail, Contact, Task, Journal Entry, or Note.
The next icon is the printer. Click the printer icon to view the printer options window. In the Print window you can select the printer you would like your calendar to be printed to by using the down arrow in the Name section. Below the printer name is the option to select what calendar you would like to print, the style, page setup, the date range, and if you would like details of private appointments hidden. To the right of the Calendar selection is the options for the number of pages, how many copies, and a collate option. Make your selections and click OK to print your calendar.
Delete is the next icon. The delete button will be grayed out unless an appointment is selected in your calendar working screen. To delete an entry in your calendar select the appointment and click the delete button. Outlook will have a window confirming you would like to delete. Click OK and the entry will be removed and placed in your deleted items folder.

Just like email messages you can color code appointments in your calendar with the category button. Click this icon to see the list of categories already entered into your Outlook. If you have an appointment that has already been assigned a category(s) and would like to remove it select the appointment, click the categories icon and select clear All Categories.
To assign a category that has already been created to an appointment click the appointment, click the category icon and select the category from the list. If you want to set more than one category to an appointment click the All Categories option. This will bring up the Color Categories window.


You will get a new window titled with the name of your group. In this window you will see the list of members you have set up in the group. If you have no members click on in the Group members box and type the name of the group member. If the person is in your contact list their email address will be found and placed in the Group Members list. Any calendars they have shared with you will be displayed in the calendar to the left of the member list.

This will make it possible for you to set appointment for the entire group. Click save and close when you are finished with the group schedule.
 The next button is the address book button. This button will open the Address book. This button is used as a reference. To view any of the contacts double click on them and their contact information will come up in a new window. In the window you can take notes on phone conversations, see what organizations they are part of, see the email groups they are include in, and a list of all of their email addresses.
In the Address book window you can type a portion of a contacts name in the search box and click the Go button to search for a name instead of scrolling through all of the names. You may also have multiple address books. If this is the case click the down arrow where it says Global Address List in the image and you can select another address book to search. The text box next to the Address Book button will do the same search without opening the window.
Tools will open an advanced find window or an options window. The Options selection will open the Addressing window. In this window you make selections to accommodate how you would like to view you contact lists.
The first option lets you change the list shown by default when you open the address book. Next is selecting what list you would like your personal contact. The last option lets you choose what list you want to search when you are typing an email. When you address an email you can type the first few letters of the email address or contacts name and a drop down list will appear for you to click on the persons email address so you don't have to type the whole address. Click OK to save the changes and return to the address book. Click the red X to close the address book.
No comments:
Post a Comment