I like using Microsoft Outlook 2007 email because of all of the other features available in one location, verses using a web based email. The first thing that needs to be done when using outlook 2007 email is to set up the email account. You will start by going to Tools and Account settings. Every email provider is a little different with the set up process. If you need help please contact your email service provider or email me with the name of the provider and I can walk you through step by step.
Once you have your account setup it is easy to send and receive email. Make sure you are in the inbox and click the New button. This will bring up a new email message. When a new email is open your window will give you options that look like the tab features in Word and Excel.

 If you have entered contacts into your address book you can click on the To button this will bring up the Select names window. You can either double click the name and this will place the contact's email address in the To section, or you can click on the each individual name and click the To button to add the person. The Cc (Carbon Copy) and Bcc (Blind Carbon Copy) work the same way.
Once you have entered all of the contacts you would like to send email to click the OK button to close the Select Names window. This will return you to your email you are composing. All of the names will be in the To, Cc, or Bcc boxes you selected. If you selected more than one name they will be separated by a semicolon.
If you do not have your address book set up or if the contact you would like to send the message to is not in your address book you can type the email address into the To, Cc, or Bcc text boxes. Click in the Subject text box and type the subject of your message. Press the tab key or click in the body of your message. Once you are finished click the send key in the upper left corner. Your message is now on it's way.
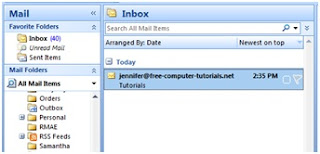 When you have received a new email message it will appear in the inbox with bold lettering. Once you have read a message it will no longer be bold.
In Outlook 2007 all of your messages are placed in date order by default.
When you start collecting email messages and have not deleted them Outlook will group them into categories. For example when in date order the categories will be today, yesterday, last week, last month, etc.

To change the order your messages are displayed click the arrange by section at the top of the Inbox. This will give you a list of options. The item with the check mark in front is the current selection. To change the selection click on the word and you will be returned to your inbox with the email sorted by the new selection.
Next to Arrange By is the newest on top. This will change depending on the way you have your email sorted. By clicking the text it will sort you email ascending or descending. It may say A on top or Z on top; or largest on top or smallest on top depending on the selection made in Arrange by.
Above the Arrange by is the search all mail items text box. If you have several emails and are looking for a specific item you can type a key word into this box and click the magnifying glass or press enter and Outlook 2007 will find emails containing the keyword.
 The tool bar at the top of the screen can be changed by adding or removing buttons. I am going to go over all of the buttons that could possibly be in the tool bar. To change the buttons listed click the down arrow at the far right of the buttons.
This will open the Add or Remove buttons option. Place your mouse over the selection and then mouse over Standard. This will give you a list of all possible options. The buttons with a check mark are displayed at the top of the screen. Click on the icons to remove the checkmarks or add check marks.


The first button is New. The New button will open a new email. If you click the down arrow in the New button you will see a list of all of the features in Outlook 2007 that you can create. No matter what section of Outlook you are in the New button will be present. It will just have a new icon. When the down arrow is clicked you will still see the same features.
The next button in the row of icon features is Print. This is a quick print feature. It will print the email that is selected.
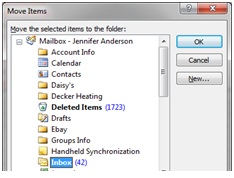
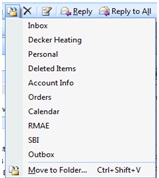 Click the folder button and you will see a list of folders you have created you can move the selected email message to. The list will have the most used folders. If you have not created any folders or you do not see the folder you are looking for you can click the last option Move to Folder. This will open the Move Items window. In this window you will see all of your folders listed and the New Option to create new folders. Once you have made your selection click the OK button to return to your emails.
Next to the Folders icon is the Delete button. To delete your email you select the email by clicking on it and then click the X icon to delete the message.
The Reply button will open a new email automatically addressed to the person who sent you the email you have selected. There will be RE: in front of the subject of the message so the recipient knows what message you are responding to. The original message from the sender will be at the bottom of the email you are sending.
Reply all is the icon you would choose if you received an email that was addressed to multiple people and you would like to send a response to everyone not just the sender. This will work the same way as the Reply button. When you click the Reply All Icon it will open a new email message but this time it will have all the recipients in the to section.
The forward button is used when you want to send a received message to someone other than the original sender. Select your message and click Forward. This will open a new email will the original email at the bottom of the message and FW in front of the subject so the recipient knows that you are sending a message you received from someone else. You need to either type the email address into the To section or click the To button and select the recipients.
 he category button will help you categorize everything you keep in Outlook 2007 by color. Click the category button and you will see a list of color coded categories you have already created. Once you assign an email a category there will be the color coded square next to the email in your email list.
The first selection in the category drop down menu is Clear All Categories. This will be grayed out unless you have selected an email that has already been assigned a category. If you want to remove the category from the email click the Clear All Categories selection.
The next selection is Create Category Search Folder. This will create a folder located in the left hand column under Search folders and place links to the email with the search criteria in that folder.
 Click the Create Category search folder selection and the New search folder window will open. In this window you can select options and criteria for you email messages. For example you can select Mail from specific people. Then click the choose button a window will come up with a list of contacts.
Select one or multiple contacts by clicking on them and clicking the from button. When you are finished selecting contacts click OK to return to the New Search Folder window. Select the mail folder you want to search in for the criteria and click OK. This will place a new folder in the left hand column under Search folders titled with the name of the contacts. Every time you receive an email from one of the contacts it will be placed in this folder in addition to the inbox. This will make it easier to find emails from the specified contacts. Once the email is deleted from either folder it will no longer appear in the inbox or the search folder.
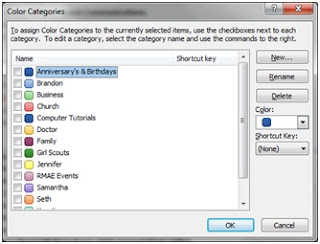
Below all of the categories is an all category selection. Click this selection and the Color Categories window comes up. In this window you can change the color and rename categories that already exist and create new categories by clicking the new button.
You are also able to create short cut keys for categories which allows you to use the keyboard instead of the mouse to categorize your emails. You can also assign multiple categories using this window. To assign multiple categories place a check mark in the box next to each category. Click the Ok button when you are finished making changes.
The flag icon is for marking emails with a follow up reminder. Follow up reminders can be done by selecting the email and click the flag icon and making a selection or by clicking the outlined flag next to the email in the email list. When using the flag icon in the tool bar you are given more selections. You can select the amount of time you have to follow up on a message by using the different colored flag selections.
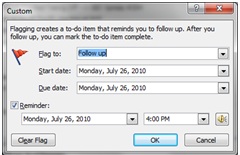
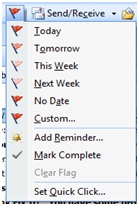 The Add Reminder option will open the Custom window and let you use the drop down arrows to select the type of flag, the start date, due date, and when to set the reminder to pop up. Click the OK button to close the Custom window and return to your email messages.
 Mark complete can be used by clicking the Flag icon in the tool bar and clicking the selection Mark complete or by clicking the flagged email in your email list to place a check mark next to the email to show you completed the follow up on the message.
Clear Flag is used to take the flag away to show the email no longer needs follow up. To use this select an email that has a follow up flag. Click the Follow up icon flag and select Clear Flag.
 Set Quick Click opens the Set Quick Click window. In this window you can select the type of follow up flag you want when you click the follow up section of an email message. Use the down arrow to make your selection and click OK to save the selection. This will close the window and return you to your email.
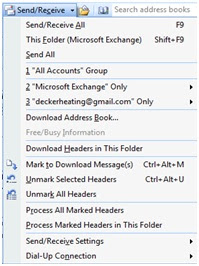
The next icon is Send/Receive. Click the down arrow to a list of all of the selections with this feature. The first selection is Send/Receive All this will force Microsoft Outlook 2007 to send and receive all messages immediately instead of waiting for the default time to check for new messages.
This Folder will only send and receive messages from the folder listed. This is used when you have more than one email account or news group you receive message from.
Send All only sends message it will not check for new messages coming in.
If you have more than one account set up in Microsoft Outlook 2007 they will be listed in the next few selections. An account group is used to separate and define how often email messages are sent, size limits, folders to include, and settings when offline. These features are used to override the default settings for each email group.
The Download Address Book selection is only available if you are using Microsoft exchange. Most home users will not use exchange. The Download Address Book selection downloads updates to the address book manually. This update is usually scheduled but by selecting this option you will force a download of updates.
Download Headers in This Folder is used to manually download just the headers of the email in the selected folder if you want the rest of the email you will have to download each individual email when it is opened.
Once the headers from your email have been downloaded you can mark them to download the rest of the email with the Mark to Download messages option. Click on the email and click on this selection. If you want to unmark the selected email before it is downloaded click the Unmark Selected Headers. You can also unmark All Headers with the next selection.
When you are finished marking the Headers click Process All Marked Headers to download the rest of the email message you have marked. To download an entire folder of marked emails click Process Marked Headers in This Folder. The body of the marked headers will be downloaded to outlook for you to read.
 Send/Receive Settings has several options. The first option is Define Send/Receive Groups. Click on this option and the Send/Receive Groups window opens. In this window you can add or delete email accounts to the group, set automatic send receive times, and set on and offline options.

Click the new button to add a group to the list. A window will come up for you to type a name for the group. Click OK to return to the Send/Receive Groups window. The new group name will appear in the list. The copy button will copy all of the selected group settings and create another copy of the group. Remove will remove a group from the list and Rename will give you a window to give your group a new name.
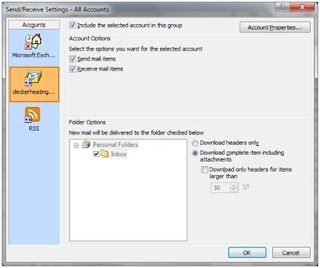
Select the group and click Edit. When you click Edit the Send/Receive Settings window will come up. In this window you will see all of your accounts on the left column. Select each account to sent the options available with the check boxes. The Account Properties button will open the Account Setting window used to set up the email account originally. To close the window click OK to save changes or Cancel to discard changes and return to the Send/Receive email window.
Click close to return to your email account in Outlook 2007.
The next feature in the Send/Receive button, Send/Receive Settings option is Disable Scheduled Send/Receive. By clicking on the option you will place a check next to the selection and the scheduled send and receives will not take place.

The next selection is Show progress when you click this option it will bring up the Outlook Send/Receive Progress window. In this will you will see a list of email accounts, the status of the send/receive process and how many items are remaining to send and receive. When you are finished with the Progress window click the red x in the upper right hand corner and the window will close. The details button will reduce or the window to just the green status bar and if clicked again it will show the status as shown in the image to the right.
The last option is to make your folders available off line. When checked you will be able to see all messages when you are not connected to the internet. If you do not make the folder available off line you will not be able to view the folder unless you are connected to you email account.
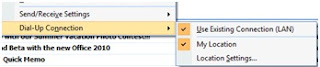 The dial up connection can be used if you have a modem connected to your computer or have settings and equipment to make calls from your computer. The selected setting will show a check mark next to them.
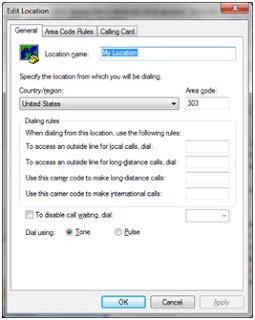
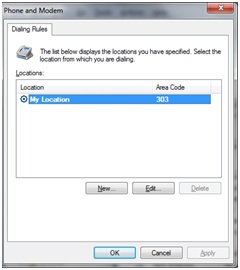 If you want to change these settings click Location settings. The Phone and Modem window comes up in this window you set your area code, or select a different location if you have multiple locations set up. The new and Edit button bring up the Edit Location window. In this window type the name of your location. In the Country/region section use the drop down arrow and select the location then type the area code you will be calling from. The next section is your dialing rules. If you are using a business line you may need to dial a specific number to reach an outside line. If that is the case type that number in the To access an outside line for local calls dial: section. If the number is different for long distance calls type the number into the next section. If a calling code is needed for long distance or international calls type these codes in the next to text boxes. The computer will put these codes in when making calls from Outlook 2007. Check the box if you would like to disable call waiting and type the number used to disable the call waiting on the phone system. Select the type of dial tone you will be using and click the OK button to apply your changes and close the Edit Location window. You will return to the Phone and Modem window, click OK to return to your Outlook screen.
The next button is create rule. Select and email you would like to create a rule for then click this button and the Create rule window will open. This feature is used to create rules about incoming and outgoing emails.
 Rules can be created for a person, a date, or who the email is sent to. Select the criteria by clicking the check box in front of the selection and if the option has a text box you can change the text. Next you need to tell Outlook what to do the email if it meets the set criteria. The Display in the New Item Alert window will have an alert pop up window when a message is received that meets the set criteria. Play a selected sound will give a one time notification sound that you select. Move the Item to folder will remove the item from the inbox and place it in the selected folder.

If an option is not listed click the Advanced Options button and the Rules wizard window will open. In the Rules wizard you will start with step 1 selecting the conditions. Place a check mark in the boxes next to the conditions you would like to set for the email. Click next to move onto the action select what action you would like to apply if the email meets the conditions set. Click next to move onto the exceptions. Select the exception to apply to the email and click next. The last step to setting up an advanced rule in Outlook is to name the rule, select the first box if you want to apply the rule to emails that have already been received and/or the box to run the new rule now. Click finish and the rule will be applied and you will return to the create rule window. Click OK in this window to apply the changes and return to your email.
The next button is the address book button.
 This button will open the Address book. This button is used as a reference.
To view any of the contacts double click on them and their contact information will come up in a new window. In the window you can take notes on phone conversations,
see what organizations they are part of, see the email groups they are include in, and a list of all of their email addresses.

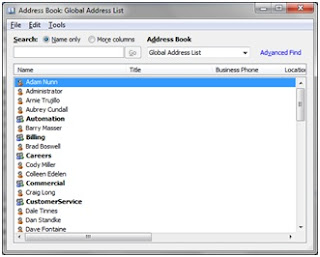
In the Address book window you can type a portion of a contacts name in the search box and click the Go button to search for a name instead of scrolling through all of the names.
You may also have multiple address books. If this is the case click the down arrow where it says Global Address List in the image and you can select another address book to search. The text box next to the Address Book button will do the same search without opening the window.
The File, Edit, and Tools menus give you some of the features available in the contact section of Outlook. The File menu gives you the options to create a new contact, create a new message to the selected contact/contacts, add a contact to a different list, delete a contact, or view the properties. Edit will let you undo a change, cut, copy, and paste.

Tools will open an advanced find window or an options window. The Options selection will open the Addressing window. In this window you make selections to accommodate how you would like to view you contact lists. The first option lets you change the list shown by default when you open the address book. Next is selecting what list you would like your personal contact. The last option lets you choose what list you want to search when you are typing an email. When you address an email you can type the first few letters of the email address or contacts name and a drop down list will appear for you to click on the persons email address so you don't have to type the whole address. Click OK to save the changes and return to the address book. Click the red X to close the address book.
The last button is the Help button. This button will bring up a help window for you to search for questions about Outlook 2007.
Once you have your account setup it is easy to send and receive email. Make sure you are in the inbox and click the New button. This will bring up a new email message. When a new email is open your window will give you options that look like the tab features in Word and Excel.


Once you have entered all of the contacts you would like to send email to click the OK button to close the Select Names window. This will return you to your email you are composing. All of the names will be in the To, Cc, or Bcc boxes you selected. If you selected more than one name they will be separated by a semicolon.
If you do not have your address book set up or if the contact you would like to send the message to is not in your address book you can type the email address into the To, Cc, or Bcc text boxes. Click in the Subject text box and type the subject of your message. Press the tab key or click in the body of your message. Once you are finished click the send key in the upper left corner. Your message is now on it's way.
 When you have received a new email message it will appear in the inbox with bold lettering. Once you have read a message it will no longer be bold.
 In Outlook 2007 all of your messages are placed in date order by default.
When you start collecting email messages and have not deleted them Outlook will group them into categories. For example when in date order the categories will be today, yesterday, last week, last month, etc.
To change the order your messages are displayed click the arrange by section at the top of the Inbox. This will give you a list of options. The item with the check mark in front is the current selection. To change the selection click on the word and you will be returned to your inbox with the email sorted by the new selection.
Next to Arrange By is the newest on top. This will change depending on the way you have your email sorted. By clicking the text it will sort you email ascending or descending. It may say A on top or Z on top; or largest on top or smallest on top depending on the selection made in Arrange by.
Above the Arrange by is the search all mail items text box. If you have several emails and are looking for a specific item you can type a key word into this box and click the magnifying glass or press enter and Outlook 2007 will find emails containing the keyword.

This will open the Add or Remove buttons option. Place your mouse over the selection and then mouse over Standard. This will give you a list of all possible options. The buttons with a check mark are displayed at the top of the screen. Click on the icons to remove the checkmarks or add check marks.
The first button is New. The New button will open a new email. If you click the down arrow in the New button you will see a list of all of the features in Outlook 2007 that you can create. No matter what section of Outlook you are in the New button will be present. It will just have a new icon. When the down arrow is clicked you will still see the same features.
The next button in the row of icon features is Print. This is a quick print feature. It will print the email that is selected.
Click the folder button and you will see a list of folders you have created you can move the selected email message to. The list will have the most used folders. If you have not created any folders or you do not see the folder you are looking for you can click the last option Move to Folder. This will open the Move Items window. In this window you will see all of your folders listed and the New Option to create new folders. Once you have made your selection click the OK button to return to your emails. Next to the Folders icon is the Delete button. To delete your email you select the email by clicking on it and then click the X icon to delete the message.
The Reply button will open a new email automatically addressed to the person who sent you the email you have selected. There will be RE: in front of the subject of the message so the recipient knows what message you are responding to. The original message from the sender will be at the bottom of the email you are sending.
Reply all is the icon you would choose if you received an email that was addressed to multiple people and you would like to send a response to everyone not just the sender. This will work the same way as the Reply button. When you click the Reply All Icon it will open a new email message but this time it will have all the recipients in the to section.
The forward button is used when you want to send a received message to someone other than the original sender. Select your message and click Forward. This will open a new email will the original email at the bottom of the message and FW in front of the subject so the recipient knows that you are sending a message you received from someone else. You need to either type the email address into the To section or click the To button and select the recipients.

The first selection in the category drop down menu is Clear All Categories. This will be grayed out unless you have selected an email that has already been assigned a category. If you want to remove the category from the email click the Clear All Categories selection.
The next selection is Create Category Search Folder. This will create a folder located in the left hand column under Search folders and place links to the email with the search criteria in that folder.
Click the Create Category search folder selection and the New search folder window will open. In this window you can select options and criteria for you email messages. For example you can select Mail from specific people. Then click the choose button a window will come up with a list of contacts.Select one or multiple contacts by clicking on them and clicking the from button. When you are finished selecting contacts click OK to return to the New Search Folder window. Select the mail folder you want to search in for the criteria and click OK. This will place a new folder in the left hand column under Search folders titled with the name of the contacts. Every time you receive an email from one of the contacts it will be placed in this folder in addition to the inbox. This will make it easier to find emails from the specified contacts. Once the email is deleted from either folder it will no longer appear in the inbox or the search folder.

Below all of the categories is an all category selection. Click this selection and the Color Categories window comes up. In this window you can change the color and rename categories that already exist and create new categories by clicking the new button.
You are also able to create short cut keys for categories which allows you to use the keyboard instead of the mouse to categorize your emails. You can also assign multiple categories using this window. To assign multiple categories place a check mark in the box next to each category. Click the Ok button when you are finished making changes.
The flag icon is for marking emails with a follow up reminder. Follow up reminders can be done by selecting the email and click the flag icon and making a selection or by clicking the outlined flag next to the email in the email list. When using the flag icon in the tool bar you are given more selections. You can select the amount of time you have to follow up on a message by using the different colored flag selections.
The Add Reminder option will open the Custom window and let you use the drop down arrows to select the type of flag, the start date, due date, and when to set the reminder to pop up. Click the OK button to close the Custom window and return to your email messages. Mark complete can be used by clicking the Flag icon in the tool bar and clicking the selection Mark complete or by clicking the flagged email in your email list to place a check mark next to the email to show you completed the follow up on the message. Clear Flag is used to take the flag away to show the email no longer needs follow up. To use this select an email that has a follow up flag. Click the Follow up icon flag and select Clear Flag.

The next icon is Send/Receive. Click the down arrow to a list of all of the selections with this feature. The first selection is Send/Receive All this will force Microsoft Outlook 2007 to send and receive all messages immediately instead of waiting for the default time to check for new messages.
This Folder will only send and receive messages from the folder listed. This is used when you have more than one email account or news group you receive message from.
Send All only sends message it will not check for new messages coming in.
If you have more than one account set up in Microsoft Outlook 2007 they will be listed in the next few selections. An account group is used to separate and define how often email messages are sent, size limits, folders to include, and settings when offline. These features are used to override the default settings for each email group.
The Download Address Book selection is only available if you are using Microsoft exchange. Most home users will not use exchange. The Download Address Book selection downloads updates to the address book manually. This update is usually scheduled but by selecting this option you will force a download of updates.
Download Headers in This Folder is used to manually download just the headers of the email in the selected folder if you want the rest of the email you will have to download each individual email when it is opened.
Once the headers from your email have been downloaded you can mark them to download the rest of the email with the Mark to Download messages option. Click on the email and click on this selection. If you want to unmark the selected email before it is downloaded click the Unmark Selected Headers. You can also unmark All Headers with the next selection.
When you are finished marking the Headers click Process All Marked Headers to download the rest of the email message you have marked. To download an entire folder of marked emails click Process Marked Headers in This Folder. The body of the marked headers will be downloaded to outlook for you to read.

Click the new button to add a group to the list. A window will come up for you to type a name for the group. Click OK to return to the Send/Receive Groups window. The new group name will appear in the list. The copy button will copy all of the selected group settings and create another copy of the group. Remove will remove a group from the list and Rename will give you a window to give your group a new name.

Select the group and click Edit. When you click Edit the Send/Receive Settings window will come up. In this window you will see all of your accounts on the left column. Select each account to sent the options available with the check boxes. The Account Properties button will open the Account Setting window used to set up the email account originally. To close the window click OK to save changes or Cancel to discard changes and return to the Send/Receive email window.
Click close to return to your email account in Outlook 2007.
The next feature in the Send/Receive button, Send/Receive Settings option is Disable Scheduled Send/Receive. By clicking on the option you will place a check next to the selection and the scheduled send and receives will not take place.

The next selection is Show progress when you click this option it will bring up the Outlook Send/Receive Progress window. In this will you will see a list of email accounts, the status of the send/receive process and how many items are remaining to send and receive. When you are finished with the Progress window click the red x in the upper right hand corner and the window will close. The details button will reduce or the window to just the green status bar and if clicked again it will show the status as shown in the image to the right.
The last option is to make your folders available off line. When checked you will be able to see all messages when you are not connected to the internet. If you do not make the folder available off line you will not be able to view the folder unless you are connected to you email account.
 The dial up connection can be used if you have a modem connected to your computer or have settings and equipment to make calls from your computer. The selected setting will show a check mark next to them.
 If you want to change these settings click Location settings. The Phone and Modem window comes up in this window you set your area code, or select a different location if you have multiple locations set up. The new and Edit button bring up the Edit Location window. In this window type the name of your location. In the Country/region section use the drop down arrow and select the location then type the area code you will be calling from. The next section is your dialing rules. If you are using a business line you may need to dial a specific number to reach an outside line. If that is the case type that number in the To access an outside line for local calls dial: section. If the number is different for long distance calls type the number into the next section. If a calling code is needed for long distance or international calls type these codes in the next to text boxes. The computer will put these codes in when making calls from Outlook 2007. Check the box if you would like to disable call waiting and type the number used to disable the call waiting on the phone system. Select the type of dial tone you will be using and click the OK button to apply your changes and close the Edit Location window. You will return to the Phone and Modem window, click OK to return to your Outlook screen.
The next button is create rule. Select and email you would like to create a rule for then click this button and the Create rule window will open. This feature is used to create rules about incoming and outgoing emails.


If an option is not listed click the Advanced Options button and the Rules wizard window will open. In the Rules wizard you will start with step 1 selecting the conditions. Place a check mark in the boxes next to the conditions you would like to set for the email. Click next to move onto the action select what action you would like to apply if the email meets the conditions set. Click next to move onto the exceptions. Select the exception to apply to the email and click next. The last step to setting up an advanced rule in Outlook is to name the rule, select the first box if you want to apply the rule to emails that have already been received and/or the box to run the new rule now. Click finish and the rule will be applied and you will return to the create rule window. Click OK in this window to apply the changes and return to your email.
The next button is the address book button.
 This button will open the Address book. This button is used as a reference.
To view any of the contacts double click on them and their contact information will come up in a new window. In the window you can take notes on phone conversations,
see what organizations they are part of, see the email groups they are include in, and a list of all of their email addresses.
In the Address book window you can type a portion of a contacts name in the search box and click the Go button to search for a name instead of scrolling through all of the names.
You may also have multiple address books. If this is the case click the down arrow where it says Global Address List in the image and you can select another address book to search. The text box next to the Address Book button will do the same search without opening the window.
The File, Edit, and Tools menus give you some of the features available in the contact section of Outlook. The File menu gives you the options to create a new contact, create a new message to the selected contact/contacts, add a contact to a different list, delete a contact, or view the properties. Edit will let you undo a change, cut, copy, and paste.
Tools will open an advanced find window or an options window. The Options selection will open the Addressing window. In this window you make selections to accommodate how you would like to view you contact lists. The first option lets you change the list shown by default when you open the address book. Next is selecting what list you would like your personal contact. The last option lets you choose what list you want to search when you are typing an email. When you address an email you can type the first few letters of the email address or contacts name and a drop down list will appear for you to click on the persons email address so you don't have to type the whole address. Click OK to save the changes and return to the address book. Click the red X to close the address book.
The last button is the Help button. This button will bring up a help window for you to search for questions about Outlook 2007.
No comments:
Post a Comment