In the Windows Vista File Structure tutorial we will cover how to view files in different ways, organizing and moving files, and creating new folders
Understanding how to view your files and where they are located is very important. I have run into so many occasions where clients are just not able to fine data they have created.
Lest start by setting up our file window to make it easier to find the information we are looking for.
Double click on My Computer. When the My Computer Window opens click on tools then folder options.
 The Folder Options window will open.

In the general tab under the Browse Folders section make sure the Open each folder in the same window is selected. If you choose to open each folder in another window things can get cluttered very quickly.
In the next section, Click items as follows, you can select to single or double click to open your foldersand files. If you have trouble with double clicking this is a great option to allow you to open your folders with a single click.
Click on the View tab.

In the View tab click the check box next to Display the full path in the address bar. Then click Apply to all folders.
This will display every folder in the address bar that you had to browse through to get to the location of the file you are looking for.
When you are finished click OK to close the window.
To view the change click on My Documents then click on any folder in your My documents folder. Notice in the address bar you have the full path name of the folder you selected. It will look something like this. C:\Documents and Settings\Jennifer\My Documents\My Music.
 Many times when you are looking at pictures you would like to see a
little preview before you open the picture. Click on the folder you keep
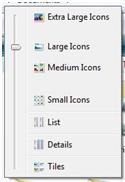
your photos in. Then click on the Views icon. You will see a drop dow
n menu with your options. Extra Large Icons is a great option if you
want to see a large preview of your pictures or if you have poor vision.
Large Icons is a little smaller, and Medium Icons and Small icons smaller
yet. List is just that a list of the folders and files. Details gives you the
Name of the folder, size of the file, type of file, and the date the file
was modified.
Now we will move onto moving files. There are 2 ways you can move a file to another location.
1. In your My Documents Window click on File and new to open a menu.

When the menu opens click folder. A new folder will appear in the window with "New Folder" highlighted for you to type a new name for the folder. Once you have typed a new name press enter.
2. Right click any where in your open window and click on New then click folder.

Your folder will appear at the bottom of your file list for you to rename.
That ends the Windows Vista File Strucutre Tutorial.
Understanding how to view your files and where they are located is very important. I have run into so many occasions where clients are just not able to fine data they have created.
Lest start by setting up our file window to make it easier to find the information we are looking for.
Double click on My Computer. When the My Computer Window opens click on tools then folder options.


In the general tab under the Browse Folders section make sure the Open each folder in the same window is selected. If you choose to open each folder in another window things can get cluttered very quickly.
In the next section, Click items as follows, you can select to single or double click to open your foldersand files. If you have trouble with double clicking this is a great option to allow you to open your folders with a single click.
Click on the View tab.

In the View tab click the check box next to Display the full path in the address bar. Then click Apply to all folders.
This will display every folder in the address bar that you had to browse through to get to the location of the file you are looking for.
When you are finished click OK to close the window.
To view the change click on My Documents then click on any folder in your My documents folder. Notice in the address bar you have the full path name of the folder you selected. It will look something like this. C:\Documents and Settings\Jennifer\My Documents\My Music.
Many times when you are looking at pictures you would like to see alittle preview before you open the picture. Click on the folder you keep
your photos in. Then click on the Views icon. You will see a drop dow
n menu with your options. Extra Large Icons is a great option if you
want to see a large preview of your pictures or if you have poor vision.
Large Icons is a little smaller, and Medium Icons and Small icons smaller
yet. List is just that a list of the folders and files. Details gives you the
Name of the folder, size of the file, type of file, and the date the file
was modified.
Now we will move onto moving files. There are 2 ways you can move a file to another location.
- Right click on a file or folder and a menu appears. Select either copy if you want the folder to remain in the current location and you want another copy somewhere else or cut if you want to remove the folder from the current location and move it to another folder. (Be carful with the cut. I don't want you to loose a folder)
Now browse to the folder you want to move the file to and right click any where in the open window and click paste. Depending on how big the file is it may take a minute.
You can also use the keyboard commands. Press CTRL and C for copy, CTRL and X for cut, and CTRL and V for paste.
- Open another window next to the window you currently have open. You will have one window on top of another. Make sure they don't overlap completely. Click on the folder or file you would like to move and drag it to the other window. This will work like a cut. The file will be removed from the current folder and be moved to the new location.
1. In your My Documents Window click on File and new to open a menu.

When the menu opens click folder. A new folder will appear in the window with "New Folder" highlighted for you to type a new name for the folder. Once you have typed a new name press enter.
2. Right click any where in your open window and click on New then click folder.

That ends the Windows Vista File Strucutre Tutorial.
No comments:
Post a Comment