In the Windows Vista Control Panel Tutorial we will only cover the features that a senior or beginner computer user would be interested in. The Control panel is full of tools to change the way Windows looks and behaves.
We will cover the topics of User Accounts and Family Safety, appearance and Personalization, and printers and Keyboard. You can click on any of these topics to jump ahead.
We are going to start with User Accounts and Family Safety. To open the Control Panel Click on Start then Control Panel in the right hand column if you are using the default start menu, if you have your start menu set to Classic the control panel is under settings. When the Control Panel opens it will look like this.

If your control panel looks different you are probably in Classic View. Click on Control panel Home in the left column. We will be continuing the tutorials in the Control Panel Home View.
User Accounts and Family Security is a place where you can add or delete users, change a password or password protect your user account, Change the picture by your name when you log on or change the way you log on and off, or set parental controls
User Accounts and Family Security is a beneficial tool because it allows each user of the computer to have there own look and feel for the Windows Desktop, customize there own favorites on the web and have their own My Documents Folder. This is also great for Parents to monitor their children’s computer usage.
Click on User Accounts and Family Settings and we will get started.

When the user Account Window opens you will see the three options under User Accounts and the two parental accounts options we will go through step by step through each option.
We will start by having a little fun with the picture that appears by our name when we log on. Click on Change your account picture.

In this window you can change the picture that appears next to your name in the Start Menu and when you log on. Browse through the pictures and pick your favorite one and click on it. If you have a favorite picture that does not appear in the list of default pictures click on the Browse for more pictures link and a window will open for you to choose one of your personal pictures.
If you made any changes click on the Change Picture button. If no changes were made click on Cancel and it will take you to this Window.

Now we will go through one by one to learn more about making changes to a user account. You do not have to make any changes to your computer but I would like you to get a feel for all of the windows incase you need to make changes in the future.
Click on Change you password

If your account is currently password protected and you would like to change the password you would enter the information in each text box and the Change Password button at the bottom. Click Cancel if you have not made any changes and you will return to the Make changes to your user account window.
Click on the Remove your password link.

If you computer is currently password protected you can type your current password into the text box and click the Remove Password button and you will no longer need a password to log into your computer. Click Cancel if you did not make and changes to return to the Make changes to your user account window.
Click on the Change your account name link
A window will pop up saying Windows needs your permission to continue. Click the Continue button.

If you have a grandchild or child that no longer uses your computer or you purchased a used computer from someone you can put your name here or type the name of someone else that would use that account. If you did not make any Changes click cancel to return to the User Accounts Window.
Next click on the Change your account type link.
Again you will see the Windows needs your permission to continue window. Click the continue button.

If you are doing this tutorial with your account you are probably set up as the administrator. As the administrator you can access all programs and files and install programs on the computer. If you are set up as a Standard User you might not be able to install certain programs. You will still be able to change your own password, picture and desktop settings.
You cannot change an account to a Standard user if they are set up as an administrator and there is only one administrator account. You would need to create another administrator account before changing an administrator to a Standard user.
If you made any changes click the cancel button to return to the user accounts window.
To switch to another account on the computer and make the same changes or create a new account you would click the Manage Another Account link. Click continue when the Windows needs your permission to continue window opens.

Click on the Create new account link. Enter the User's name and select what type of user you would like them to be then click Create New Account.
If you did not create a new account click cancel to return to the Manage Accounts Window.
Now we will move onto Parental Controls. Having 2 small children this is one of my favorite features of Windows Vista. Parental Controls helps you to manage you children's computer usage, set limits on access to the web, the hours they can log on to the computer, and which games they can play. Click on the setup Parental controls link at the bottom of the window.
 When the Parental Control Window Opens Click on a user that is not an administrator.

In the Parental Control Setup Window Click On, enforce current settings under Parental Controls. Then click on, collect information about computer usage under Activity Reporting. These 2 settings will turn on parental controls for the selected user and provide the parent an activity log of what the child is doing on the computer.
Under Windows Settings click Windows Vista Web Filter.
 I love this feature. By selecting block some web sites or content this gives you the ability to set specific websites you child is allowed to visit. You can either specify each site individually by setting the Block web content automatically to High, Medium, None, or Custom. Or click on the Edit the Allow Block List.

The Allow Block List Window lets a parent enter specific websites the child is allowed or not allowed to visit. Click OK to exit that window and return to the Parental Control Window.
If you only want the child to visit websites that are on the Allow list check the box next to Only allow websites that are on the allow list.
If you do not want you child to download any files check the box at the bottom of the window titles Block File Downloads.
When you are finished making changes click OK, or if no changes were made click Cancel to return to the Parental Controls Setup Window.
Back at the Parental Controls Setup Window click on the Time Limits link.

To block certain times your child can log onto the computer click on the boxes that correspond with the day of the week and the time of day to turn the box blue. You can highlight groups of boxes by clicking and holding the left mouse button down and dragging the mouse.
Any Blue shaded boxes will not allow the child to log onto the computer at that selected time. Click OK if changes were made other wise click cancel to return to the Parental Controls Setup Window.
The next parental controls category we will cover is games. In the parental controls window under Windows Settings click the Games link.

The Windows Vista Games window allows the parent to either allow or block any games from being played, block games with a specific rating, and block games by a specific name.
To block any games from being played click the no button under Can (user Name) play games?
If the user is allowed to play games but you want to control the rating click Set games ratings under Block (or allow) games by rating or content.

The first selection you can make is to allow or block games that do not have a rating. Click either Allow games with no rating or Block games with no rating. Then read each rating under Which ratings are ok for (user name) to play? Then choose the types of games the user will be allowed to play. The selection you choose and everything above it will be allowed. If the Rating is below what you selected that game will be blocked from play.
Click OK if you made any changes or Cancel to return to the Parental Control Game settings
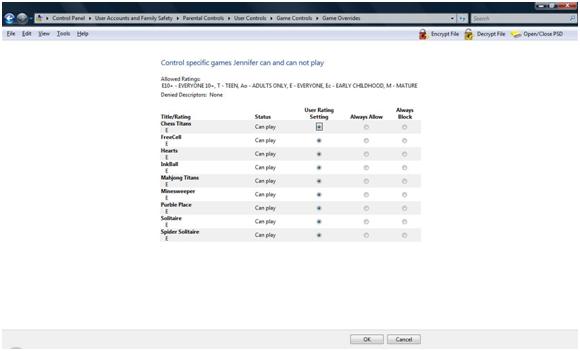
Another great feature of the Parental Control Game settings is the ability to block games by name. Click on the Block or Allow specific Games link

This window gives you the name of each game installed on the computer. To the right of the game name it gives you three options; User rating setting, Always Allow, or Always Block. If user rating setting is selected it will allow or block the game based on what you selected under the game rating section. Always allow will allow the game to be played regardless of the rating settings, and always block will block the game from being played.
If changes were made click OK. If no changes were made click cancel to return to the Parental Control window.
Click the OK button to exit the games window of Parental Controls.
Once you are back at the Main Parental Controls window click on Block or Allow specific programs link.
When the Block or allow specific programs window opens click on (user name) can only use the programs I allow button. It will take a minute for all the programs to load in the box below.

When the program list is populated scroll through the list with the down arrow on the right of the box and check the box next to each program the user will be allowed to use. After you have finished checking the programs click OK to return to Parental Controls or if no changes were made click Cancel.
The last thing is parental Controls we will cover is the activity log. I know as a parent I can't always be looking over my child’s shoulder watching what they are doing on the computer. The activity log lets you go back after your child has used the computer and see what they were doing.
In the right hand column under the User's name click on View Activity report.

This report will tell you everything the user has done on the computer. Check this report often and you will be able to tell what websites were visited, times logged on games that were played, email information, instant messaging and media. Safety on the internet is a growing problem; keep your child safe by using these wonderful tools and checking the activity report often.
Click the back arrow in the upper left corner to return to the Parental Controls Window. Click the OK button to complete this section of the Control Panel. Click on the x in the upper right corner to close the Parental Controls.
Now reopen the control panel. Click on the Appearance and Personalization link.

Notice the links in this window look familiar. We have already covered these in the Windows Vista Desktop Tutorial. This is just another way to get to the same options. Please feel free to click each link to see if you recognize the windows
The only topic we have not covered in the Appearance and personalization window is the Folder Options and this will be covered the next tutorials.
When you are finished exploring the Appearance and Personalization window click the back arrow in the upper left corner to return to the control panel
We will now move onto the Hardware and sound section of the control panel. Click on the Hardware and sound link.

In this section we will briefly cover printers, and one of the tabs in the keyboard window.
We will start with printers. Printers have never been on of my favorite topics. There are so many different brands and types of printers, and they all install and work differently. The best advice I can give you is to follow the instructions that came with your printer for easy installation.
Click on the Printers icon link.

The Printers Window will open. This window gives you all the information you need to know about the printers you currently have installed on your computer.
The Printers Window will tell you the name of your printer. If there is any number other than 0 in the documents column or under the printer name there are print jobs that are either in the process of being printed or are stuck in the print queue.
Double click on one of your printers to view the window with the list of print jobs.

If you are having printer trouble this is the window you need to be in to see what is going on. Most of the time you have a print job stuck in the queue and it needs to be deleted before you can print another document or re-print the current document.
To delete a document out of the print queue click on the print job to select it and press the delete key on your keyboard. Sometimes you are able to restart the print job to make it work. To restart a print job you select the print job you want and click document in the top tool bar. Then click restart.
Click the x in the upper right corner to return to the Printers window.
The last topic on printers I want to cover is Add a printer. Click on the add a printer link in the top toolbar.

This will open the Add Printer wizard. You can follow this wizard to install a printer. I am not going to go into detail here because every printer is different. If you have specific questions you can email me and I will send you an individual tutorial.
Click the Cancel button to go back to the Printers window. Then click the upper left back arrow to return to the Hardware and Sound Window.
Once you are back to the Control panel click on the Keyboard icon link.

There are only 2 options in the Keyboard Window. These 2 options are useful if you are typing and when you press a key the character types more than once. Repeat delay is how long you need to hold a key down before it will type more than once. Repeat rate is the speed that the character will repeat if you hold the key down too long.
Play with the sliders on both options and click in the test text box and hold down a key on the keyboard to see how the changes affect the keyboard.
The third option is how fast your cursor will blink when you are typing. You can play with the slider if you wish but the default usually works fine.
When you are finished click the OK button to return to the Mouse and Other Hardware Window.
That completes our tutorials on the Windows Vista Control Panel.
We will cover the topics of User Accounts and Family Safety, appearance and Personalization, and printers and Keyboard. You can click on any of these topics to jump ahead.
We are going to start with User Accounts and Family Safety. To open the Control Panel Click on Start then Control Panel in the right hand column if you are using the default start menu, if you have your start menu set to Classic the control panel is under settings. When the Control Panel opens it will look like this.

If your control panel looks different you are probably in Classic View. Click on Control panel Home in the left column. We will be continuing the tutorials in the Control Panel Home View.
User Accounts and Family Security is a place where you can add or delete users, change a password or password protect your user account, Change the picture by your name when you log on or change the way you log on and off, or set parental controls
User Accounts and Family Security is a beneficial tool because it allows each user of the computer to have there own look and feel for the Windows Desktop, customize there own favorites on the web and have their own My Documents Folder. This is also great for Parents to monitor their children’s computer usage.
Click on User Accounts and Family Settings and we will get started.

When the user Account Window opens you will see the three options under User Accounts and the two parental accounts options we will go through step by step through each option.
We will start by having a little fun with the picture that appears by our name when we log on. Click on Change your account picture.

In this window you can change the picture that appears next to your name in the Start Menu and when you log on. Browse through the pictures and pick your favorite one and click on it. If you have a favorite picture that does not appear in the list of default pictures click on the Browse for more pictures link and a window will open for you to choose one of your personal pictures.
If you made any changes click on the Change Picture button. If no changes were made click on Cancel and it will take you to this Window.

Now we will go through one by one to learn more about making changes to a user account. You do not have to make any changes to your computer but I would like you to get a feel for all of the windows incase you need to make changes in the future.
Click on Change you password

If your account is currently password protected and you would like to change the password you would enter the information in each text box and the Change Password button at the bottom. Click Cancel if you have not made any changes and you will return to the Make changes to your user account window.
Click on the Remove your password link.

If you computer is currently password protected you can type your current password into the text box and click the Remove Password button and you will no longer need a password to log into your computer. Click Cancel if you did not make and changes to return to the Make changes to your user account window.
Click on the Change your account name link
A window will pop up saying Windows needs your permission to continue. Click the Continue button.

If you have a grandchild or child that no longer uses your computer or you purchased a used computer from someone you can put your name here or type the name of someone else that would use that account. If you did not make any Changes click cancel to return to the User Accounts Window.
Next click on the Change your account type link.
Again you will see the Windows needs your permission to continue window. Click the continue button.

If you are doing this tutorial with your account you are probably set up as the administrator. As the administrator you can access all programs and files and install programs on the computer. If you are set up as a Standard User you might not be able to install certain programs. You will still be able to change your own password, picture and desktop settings.
You cannot change an account to a Standard user if they are set up as an administrator and there is only one administrator account. You would need to create another administrator account before changing an administrator to a Standard user.
If you made any changes click the cancel button to return to the user accounts window.
To switch to another account on the computer and make the same changes or create a new account you would click the Manage Another Account link. Click continue when the Windows needs your permission to continue window opens.

Click on the Create new account link. Enter the User's name and select what type of user you would like them to be then click Create New Account.
If you did not create a new account click cancel to return to the Manage Accounts Window.
Now we will move onto Parental Controls. Having 2 small children this is one of my favorite features of Windows Vista. Parental Controls helps you to manage you children's computer usage, set limits on access to the web, the hours they can log on to the computer, and which games they can play. Click on the setup Parental controls link at the bottom of the window.


In the Parental Control Setup Window Click On, enforce current settings under Parental Controls. Then click on, collect information about computer usage under Activity Reporting. These 2 settings will turn on parental controls for the selected user and provide the parent an activity log of what the child is doing on the computer.
Under Windows Settings click Windows Vista Web Filter.


The Allow Block List Window lets a parent enter specific websites the child is allowed or not allowed to visit. Click OK to exit that window and return to the Parental Control Window.
If you only want the child to visit websites that are on the Allow list check the box next to Only allow websites that are on the allow list.
If you do not want you child to download any files check the box at the bottom of the window titles Block File Downloads.
When you are finished making changes click OK, or if no changes were made click Cancel to return to the Parental Controls Setup Window.
Back at the Parental Controls Setup Window click on the Time Limits link.

To block certain times your child can log onto the computer click on the boxes that correspond with the day of the week and the time of day to turn the box blue. You can highlight groups of boxes by clicking and holding the left mouse button down and dragging the mouse.
Any Blue shaded boxes will not allow the child to log onto the computer at that selected time. Click OK if changes were made other wise click cancel to return to the Parental Controls Setup Window.
The next parental controls category we will cover is games. In the parental controls window under Windows Settings click the Games link.

The Windows Vista Games window allows the parent to either allow or block any games from being played, block games with a specific rating, and block games by a specific name.
To block any games from being played click the no button under Can (user Name) play games?
If the user is allowed to play games but you want to control the rating click Set games ratings under Block (or allow) games by rating or content.

The first selection you can make is to allow or block games that do not have a rating. Click either Allow games with no rating or Block games with no rating. Then read each rating under Which ratings are ok for (user name) to play? Then choose the types of games the user will be allowed to play. The selection you choose and everything above it will be allowed. If the Rating is below what you selected that game will be blocked from play.
Click OK if you made any changes or Cancel to return to the Parental Control Game settings
Another great feature of the Parental Control Game settings is the ability to block games by name. Click on the Block or Allow specific Games link
This window gives you the name of each game installed on the computer. To the right of the game name it gives you three options; User rating setting, Always Allow, or Always Block. If user rating setting is selected it will allow or block the game based on what you selected under the game rating section. Always allow will allow the game to be played regardless of the rating settings, and always block will block the game from being played.
If changes were made click OK. If no changes were made click cancel to return to the Parental Control window.
Click the OK button to exit the games window of Parental Controls.
Once you are back at the Main Parental Controls window click on Block or Allow specific programs link.
When the Block or allow specific programs window opens click on (user name) can only use the programs I allow button. It will take a minute for all the programs to load in the box below.

When the program list is populated scroll through the list with the down arrow on the right of the box and check the box next to each program the user will be allowed to use. After you have finished checking the programs click OK to return to Parental Controls or if no changes were made click Cancel.
The last thing is parental Controls we will cover is the activity log. I know as a parent I can't always be looking over my child’s shoulder watching what they are doing on the computer. The activity log lets you go back after your child has used the computer and see what they were doing.
In the right hand column under the User's name click on View Activity report.

This report will tell you everything the user has done on the computer. Check this report often and you will be able to tell what websites were visited, times logged on games that were played, email information, instant messaging and media. Safety on the internet is a growing problem; keep your child safe by using these wonderful tools and checking the activity report often.
Click the back arrow in the upper left corner to return to the Parental Controls Window. Click the OK button to complete this section of the Control Panel. Click on the x in the upper right corner to close the Parental Controls.
Now reopen the control panel. Click on the Appearance and Personalization link.

Notice the links in this window look familiar. We have already covered these in the Windows Vista Desktop Tutorial. This is just another way to get to the same options. Please feel free to click each link to see if you recognize the windows
The only topic we have not covered in the Appearance and personalization window is the Folder Options and this will be covered the next tutorials.
When you are finished exploring the Appearance and Personalization window click the back arrow in the upper left corner to return to the control panel
We will now move onto the Hardware and sound section of the control panel. Click on the Hardware and sound link.

In this section we will briefly cover printers, and one of the tabs in the keyboard window.
We will start with printers. Printers have never been on of my favorite topics. There are so many different brands and types of printers, and they all install and work differently. The best advice I can give you is to follow the instructions that came with your printer for easy installation.
Click on the Printers icon link.

The Printers Window will open. This window gives you all the information you need to know about the printers you currently have installed on your computer.
The Printers Window will tell you the name of your printer. If there is any number other than 0 in the documents column or under the printer name there are print jobs that are either in the process of being printed or are stuck in the print queue.
Double click on one of your printers to view the window with the list of print jobs.

If you are having printer trouble this is the window you need to be in to see what is going on. Most of the time you have a print job stuck in the queue and it needs to be deleted before you can print another document or re-print the current document.
To delete a document out of the print queue click on the print job to select it and press the delete key on your keyboard. Sometimes you are able to restart the print job to make it work. To restart a print job you select the print job you want and click document in the top tool bar. Then click restart.
Click the x in the upper right corner to return to the Printers window.
The last topic on printers I want to cover is Add a printer. Click on the add a printer link in the top toolbar.

This will open the Add Printer wizard. You can follow this wizard to install a printer. I am not going to go into detail here because every printer is different. If you have specific questions you can email me and I will send you an individual tutorial.
Click the Cancel button to go back to the Printers window. Then click the upper left back arrow to return to the Hardware and Sound Window.
Once you are back to the Control panel click on the Keyboard icon link.

There are only 2 options in the Keyboard Window. These 2 options are useful if you are typing and when you press a key the character types more than once. Repeat delay is how long you need to hold a key down before it will type more than once. Repeat rate is the speed that the character will repeat if you hold the key down too long.
Play with the sliders on both options and click in the test text box and hold down a key on the keyboard to see how the changes affect the keyboard.
The third option is how fast your cursor will blink when you are typing. You can play with the slider if you wish but the default usually works fine.
When you are finished click the OK button to return to the Mouse and Other Hardware Window.
That completes our tutorials on the Windows Vista Control Panel.
No comments:
Post a Comment